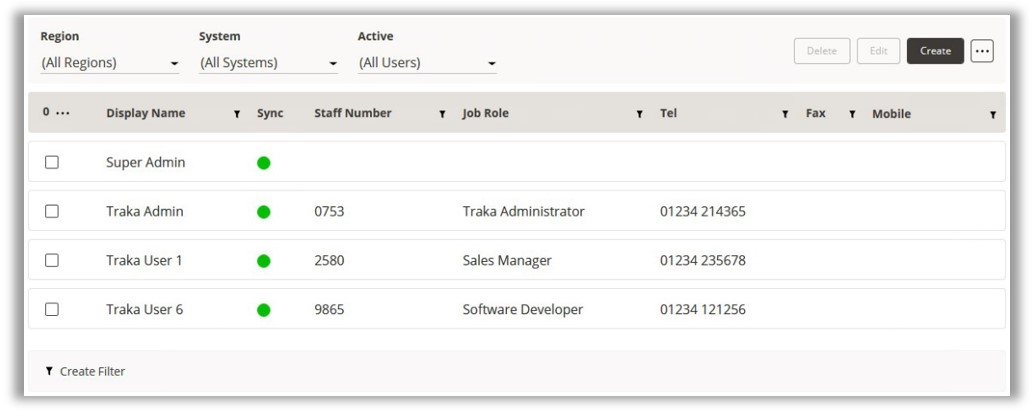
The user details window allows you to add and edit user details. From the ribbon toolbar, select the user’s icon. If you have already got users set up in your Traka Touch system then this list will be already be populated with all of those users.
Details
Here you input general information about the user, such as name, telephone number, language etc.
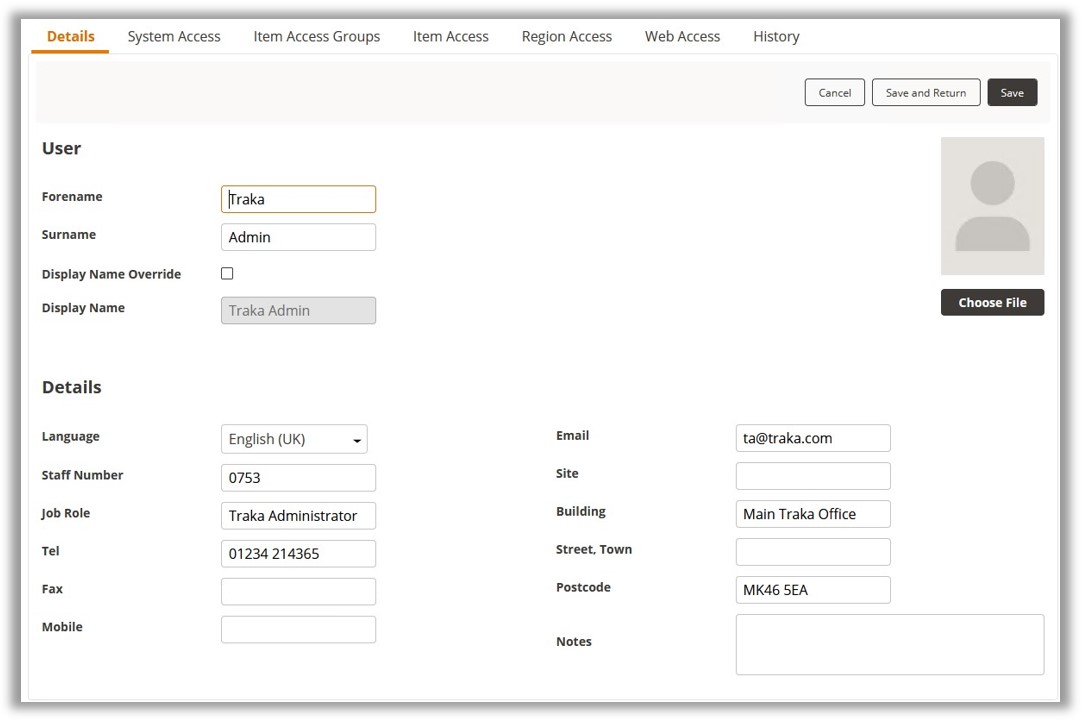
Forename & Surname
Enter the name of the user. It is essential that these fields are completed.
Display Name Override
If this option is enabled, then you can add/change how the user’s name is displayed on screen at the Traka Touch. E.g., if the Forename & Surname fields have your full name ‘Traka Admin’, you could enable Display Name Override and enter ‘Traka Admin – Traka Administrator’.
Language
When a user identifies themselves to the System, the instructions on the touch screen will be displayed in the selected language. If the default language is selected, then the default language of the Traka Touch System will be displayed.
User Details
There are eleven detail fields available to store details about the user. Each field will have a default heading that is assigned when you install TrakaWEB, for example, email. You can change the headings of each field from the User Fields page.
User Picture
Here you can add a picture of the user. Once selected, this image will display next to their name.
System Access
Here you define the systems the user has access to along with other settings such as Keypad/Card ID, PIN expiry date, Authorisation etc.
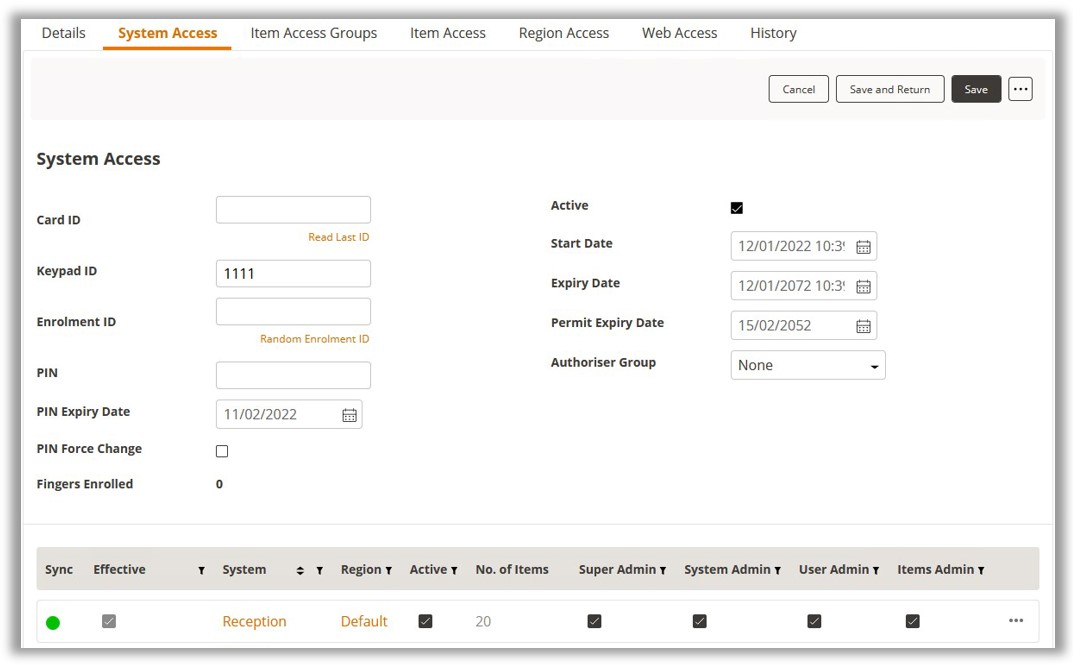
NOTE: There are two levels of access when using a Traka Touch system: Primary and Secondary. A primary level of access can be one of the following: Card ID, Keypad ID or Fingerprint ID. This means any one of those forms of ID will allow you access to the system. The secondary level of access is as optional PIN (Personal Identification Number). If a user has a PIN they will be required to enter this at the system following the input of their primary access (Card ID, Keypad ID or Fingerprint).
Card ID
Here you can input your swipe card ID number. Alternatively, you can swipe your card at the reader, click Read Last ID below the Card ID box and have TrakaWEB automatically fill in the field for you.
Keypad ID
Here you can input your keypad ID number. This is the primary ID number that will grant the user access to the system.
Enrolment ID
Enrolment ID is used in conjunction with either a Card Reader or the Sagem Fingerprint reader. This feature allows you to set a temporary enrolment number that can be emailed to a user so that when he or she enters this enrolment number at the system, they will immediately be prompted to swipe their card or enrol their fingerprint. Clicking the 'Random Enrolment ID' button from the ribbon toolbar will automatically fill this field with a random six digit number.
NOTE: The user will need to have been setup for email notifications in the Admin App.
PIN
Here you can input your PIN (Personal Identification Number). This is a secondary level of access that can be used in addition to a Keypad ID, Card ID or Fingerprint. E.g. if you have a card ID as your primary level of access, when you log into the system you will be prompted for your PIN after swiping your card.
PIN Expiry Date
This field allows you to enter a date for when the users PIN will expire. After this date, the user will be required to change their PIN the next time they access the system. If you wish the PIN to forever remain active leave this area blank.
PIN Force Change
Select this option to force the user to have to change their PIN. If selected, the user will need to change their PIN the next time they access the system.
Fingers Enrolled
Here it will display how many fingers the user currently has enrolled to the system. This is only valid for systems using the Sagem Fingerprint reader.
Active
Tick this selection box on or off to make the user active or not active as a TrakaWEB-registered user.
Start & Expiry Date
Select the start & end date and time for the when the user is active.
Permit Expiry Date
Certain users may have licences, certificates or permits that require being kept up to date. Setting an expiry date in this field will show you when the users permit(s) will expire.
Authoriser Group
When using Authorisers, they may be added to different groups depending on authorisation requirement. You may then select from the drop-down menu, the Authoriser Group that you wish to assign the user to.
System Access Grid
The system access grid will display all systems across every region within the database. From here, you can select which systems the user has access to as well as Admin permissions. Selecting the Ellipsis button will show a menu with additional software permissions such as Reports, Allowance and Curfews. These options may be refined by assigning roles to users through Software Permissions Groups. This will in turn reflect the user’s roles on Traka Touch. For more information on User Roles for Traka Touch, refer to UD0011 – Traka Touch User Guide.
NOTE: The System Access Grid will display different options depending on which feature options are enabled on the system. The example below is typical of a grid with no feature options enabled.
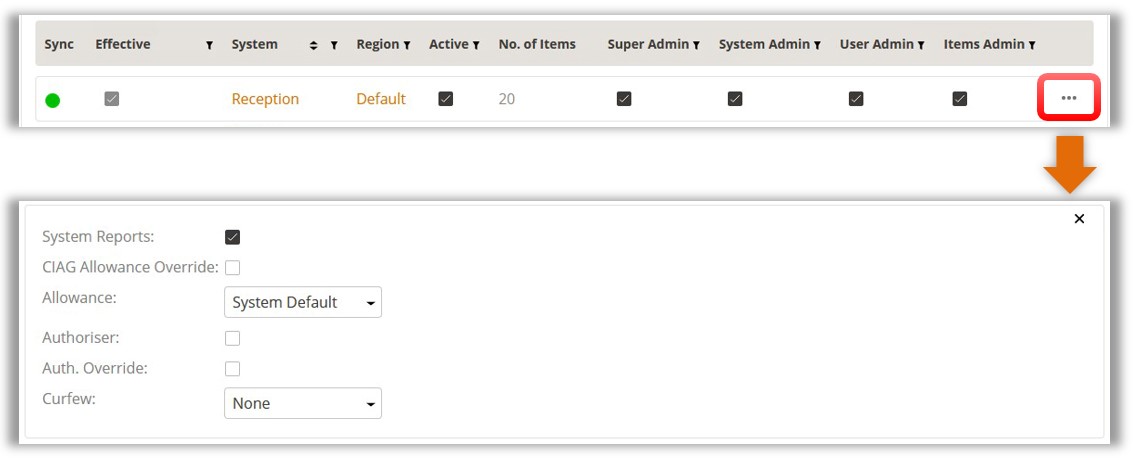
System Access Grid
Effective
The tick box named Effective is related to the Active column. When you tick the Active checkbox, the user’s information will be synchronised with the system. Once that has completed, the Effective checkbox will be ticked automatically.
System
This column will display the name of the system.
Region
This column will display the region to which the system belongs.
Active
Check this box to make the user active and allow them to use the Traka Touch system. E.g. access the system, remove items, run reports etc. (anything the user is permitted to do).
No. of Items
This column will show how many items the selected user currently has access to in each system.
Super Admin
The Super Admin role will allow grant/revoke the user with all the Admin roles regardless of any of them being selected or deselected.
System Admin
The System Admin Role will provide a grant/revoke ability to administer Systems settings, including doors admin if the system is a locker, but will not enable to edit user records or access and administer items.
User Admin
Selecting this option will provide an Admin role to grant/revoke the ability to edit User records such as adding or removing users or assigning items to users.
Items Admin
Selecting this option will add an Item admin role which will grant/revoke the ability to administer Item records, enabling a user to access items or replace damaged or broken iFobs.
Additional Permissions
Additional permissions are available upon expanding each of the system’s panel by clicking on the Ellipsis button next to each system.
System Reports
Selecting this tick box will allow the user to view & run reports at the Traka Touch system.
CIAG Allowance Override
Selecting this tickbox will enable a user to override any Common Item Access Group allowance settings.
Allowance
Allowance can restrict the total number of iFobs/items users can have out of the system at any one time. Using the drop down selection box, you are able to select a quantity or alternatively, select unlimited for no restriction. The maximum will be however many iFobs/items you have in the selected system.
Authoriser
Selecting this option will enable the user to authorise certain activities such as another user removing items. Please refer to the Authoriser section for more information.
Authorisation Override
Selecting this option will enable an admin user to self-authorise. If an item requires authorisation, a user with this option ticked will bypass the authorisation process.
Curfew
Curfews are used to reduce the amount of time an iFob/item is out of a system, or how long a user can have an iFob/item in their possession. There are two different types of curfew; Relative & Absolute. You can set these curfews against both users and iFobs/items. This is a very useful feature within businesses that have shift patterns and users taking many iFobs/items from various systems, as it will highlight if they are not returned to the system by the end of a users’ shift. Please refer to the Curfews section for specific details.
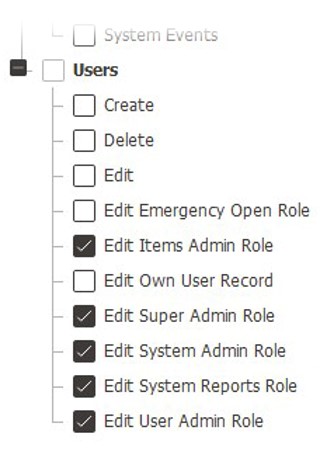
NOTE: Your ability as a TrakaWEB administrator user to manage each of the Admin Roles on the System Access Grid can be enabled or disabled through Software Permissions Groups as shown below.
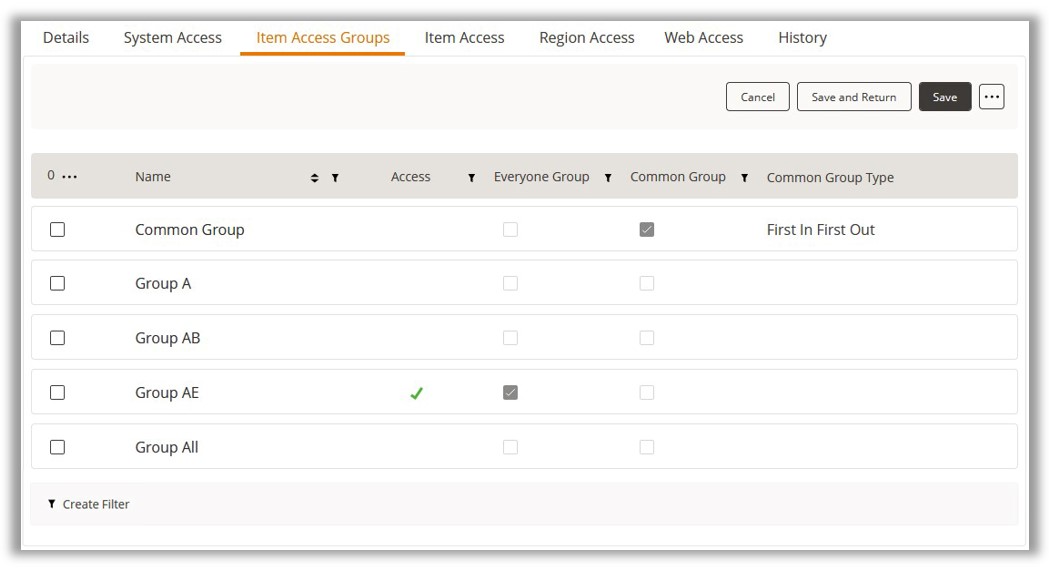
Item Access Groups
You can also grant or revoke access to an entire group of items by using the Item Access Groups section.
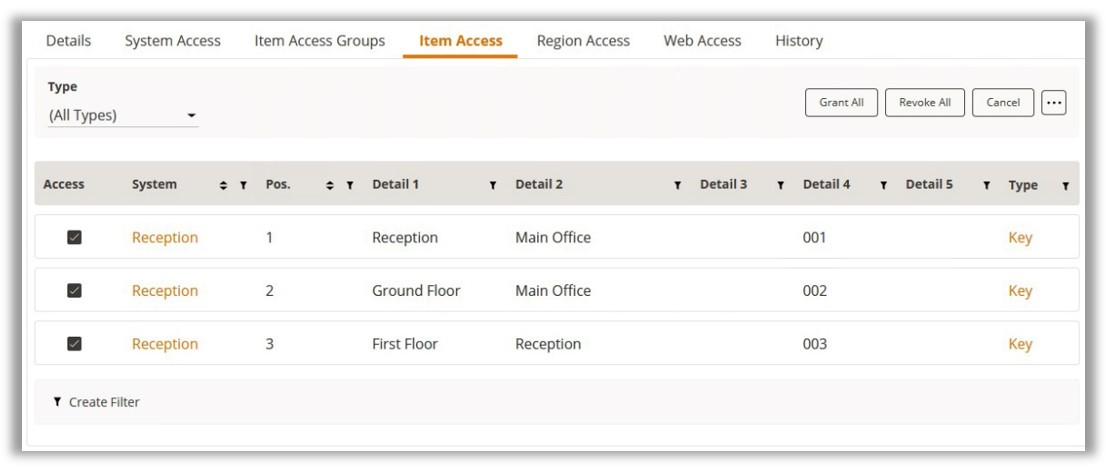
Item Access
Here you can grant/revoke access to items across all systems and regions.
Item Access Grid
Simply checking the Access box next to the desired position will allow the user to remove that item from the system. Selecting the Grant All button will tick all the access boxes allowing the user access to everything. Selecting ‘Revoke All’ will untick everything removing all access respectively.
NOTE: For more information on Software Item Access Restrictions, refer to the Software Permissions Groups section.
Region Access
Here you can place the user into a Region. Simply tick the access box on the left of the region you wish the user to belong to.
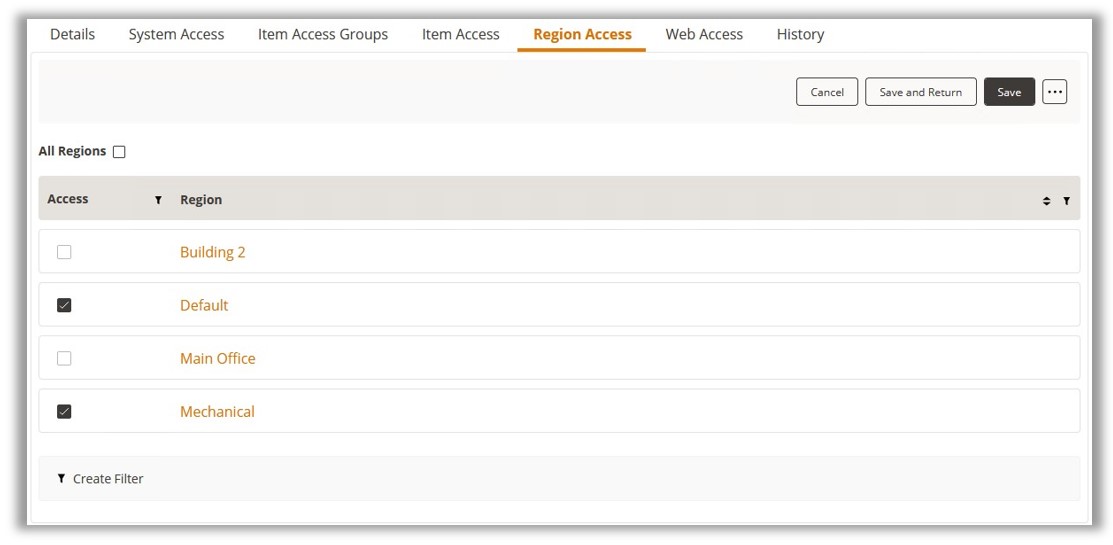
Selecting the all regions tick box will put the user in all regions automatically.
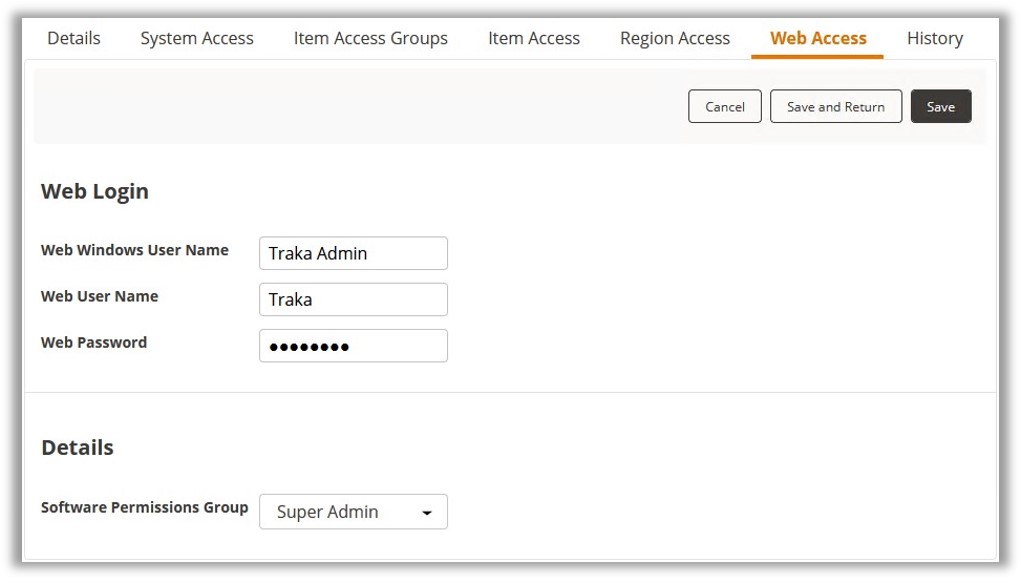
Web Access
In the Web access tab, a user can be given a separate username and password that will allow them to log into TrakaWEB. It is possible to assign a user to a Software Permissions Group here as well. For more information on Web Access groups, please see the Software Permissions Groups section.